Flashforge has just released it's newest flagship 3D printer the Flashforge Adventurer 5M Pro, and today we're going to be comparing the differences between this printer and the Adventurer 4 Pro to find out whether it is worth upgrading to the new Adventurer 5M Pro or not.
There's quite a few differences between these two printers to cover so to make it easier I have segmented this comparison into 4 categories.
1. Size
2. Hardware
3. Filament
4. Printer Interface
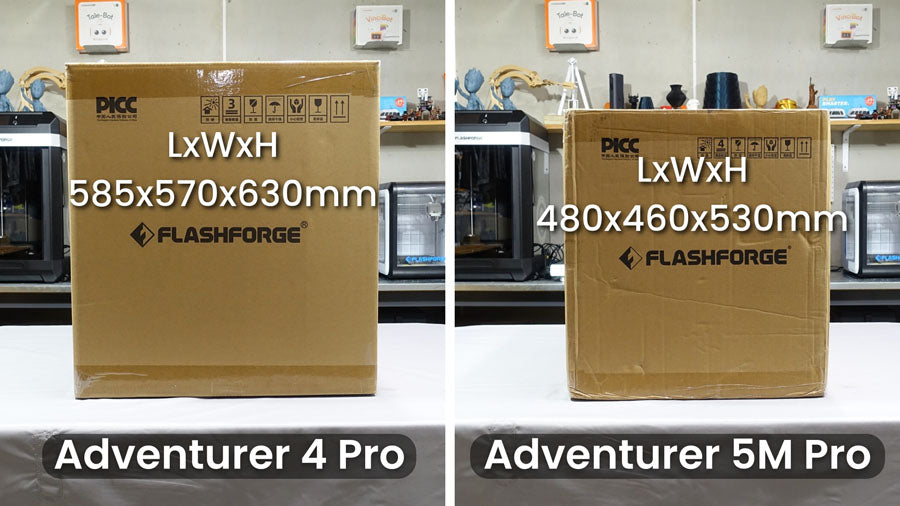
Size
The first thing that you'll notice is that the Adventurer 5M Pro's box is significantly smaller than the Adventurer 4 Pro's. In fact the 5M Pro's box is almost identical to the Adventurer 3!
Once the printers are out of the box, you get a better idea of the size difference and as you can see here the Adventurer 5M Pro is indeed smaller. The Adventurer 4 Pro comes in at 500 x 470 x 540mm, and the Adventurer 5M Pro comes in at 380 x 400 x 450mm.

The general rule of thumb with 3D printers is a bigger printer means a bigger build size however as you can see in the picture below, the Adventurer 4 Pro has only a slightly bigger build size. The Adventurer 4 Pro has a max build volume of 220 x 200 x 250mm and the Adventurer 5M Pro has a slightly smaller max build volume of 220 x 220 x 220mm.

Hardware
Both the Adventurer 4 Pro and Adventurer 5M Pro come with a double-sided build plate. The 4 Pro has a smooth PEI coating on one side and uncoated steel on the other. With the Adventurer 5M Pro Flashforge has opted for a textured PEI coating on both sides of the plate.

The design structure has been upgraded with the 5M Pro opting for a CoreXY structure instead of the widely popular Cartesian design. According to Flashforge this CoreXY design allows the 5M Pro to print at speeds of 300mm/s by default and with a max travel speed of 600mm/s.

Another upgrade Flashforge has made is the extruder. The Adventurer 4 Pro uses a bowden style extruder whereas the Adventurer 5M Pro has a direct drive extruder. This upgrade should help push the filament through the head quicker while also reducing extrusion related issues.

The 5M Pro's extruder head still has the same number of fans as the 4 Pro however the head now has a removable face plate for easy access to the nozzle, making unclogging nozzles and fixing extruder issues a lot easier.

Flashforge has also added a cable chain or drag chain to the 5M Pro and have changed the extruder head cable from a flat cable to a more stronger and robust cable. which are some nice quality of life upgrades.

There is also no more teflon tube joint so you will no longer have the issue of the guide tube coming loose or being stuck in the head. Nice job Flashforge!

The Adventurer 4 Pro brought 2 new nozzles to the table a 240 degree HS 0.4mm nozzle and a 265 degree Hardened 0.6mm nozzle, bringing the total amount of nozzles compatible with the Adventurer 4 Pro to a whopping 6! Which in my opinion is a little overwhelming and frustrating as you had to constantly change nozzles due to both temperature and diameter.
With the release of the 5M Pro Flashforge has released 4 new nozzles.
- 0.4mm (included with the 5M Pro)
- 0.6mm (included with the 5M Pro)
- 0.25mm (can be purchased separately)
- 0.8mm (can be purchased separately)

All these nozzles are 280 degree nozzles with both the 0.6 and 0.8mm nozzles being hardened This reduces the compatible nozzle count by two and means that you will only be swapping your nozzle based on one factor diameter.
Having an increased max temp of 280 degrees also makes this printer compatible with engineering filaments which we will mention later in the blog.
The last main difference in hardware is the spool holder which has now been relocated to the back of the machine instead of being built in to the side like on the Adventurer 4 Pro.

Now this does reduce the form factor of the machine significantly, however it can be a bit of a pain having to reach over the back of the machine to load and change filament.
Luckily some of the Flashforge Community have already created side mounted spool holders that can be 3D printed and added onto the printer.

Filament
Out of the box the Adventurer 4 Pro comes with a 1kg spool of HS PLA the Adventurer 5M Pro on the other hand only comes with a 250g spool of HS PLA which is a little disappointing however this may have helped them reduce the price of this new printer.

The Adventurer 4 Pro with its highest temperature nozzle being 265 degrees can print the following filament types; PLA, ABS, PC, PETG, PLA-CF and PETG-CF. It can also print TPU 95A and ASA however FlashPrint does not currently have profiles for them.
The Adventurer 5M Pro with its new range of 280 degree nozzles can print the following filament types; PLA, ABS, PC, PETG, PLA-CF, PETG-CF, TPU 95A, ASA, ASA-CF and PA.
Printer Interface
The whole printer UI has had a revamp with the first main difference being that the categories are now small icons on a sidebar instead of large icons in the middle of the screen. Now there may be a new UI however most of the printers functions can still be found under the same main categories.

The first category on both printers is the Build category where you can choose to print pre-loaded files or print files from an installed USB.
The second category on the Adventurer 4 Pro is the prepare category where you can preheat both the print bed and extruder head, as well as load and unload filament. On the Adventurer 5M Pro this category has been changed to just filament and this is where you can load and unload filament. There is no preheat function on the Adventurer 5M Pro.
The third category on both printers is the Settings category. On the Adventurer 4 Pro this category is where you can move and home your printer, connect your printer to the internet, factory reset your printer, turn on and off filament run out detection and sound as well as access the built-in camera to toggle on images and time-lapses.
On the Adventurer 5M Pro this category is where you can move and home your printer, connect your printer to the internet, level and perform a vibration compensation turn on and off filters as well as access the built-in camera to toggle on images and time-lapses.
The last category on the Adventurer 4 Pro is the Maintain category and is where you can upgrade your printers firmware, download logs, level and adjust z-offset as well as change extruder and access a troubleshoot guide.
The last category on the Adventurer 5M Pro is the Information category and is where you can upgrade your printers firmware, download logs, factory reset your printer, turn on or off sound, filament detection and auto shutdown as well as access maintenance guides and after sales support.
Conclusion
After comparing these 2 printers I can confidently say that the Adventurer 5M Pro is a significant upgrade from the Adventurer 4 Pro.
It is very easy to setup, prints 100mm/s faster by default, produces exceptional quality prints and is compatible with other slicers such as Orca Slicer which brings you more options to refine your printed models including tree supports which are super easy to remove and seam settings making the seam almost if not invisible.
Flashforge has done a fantastic job with this printer and in my opinion they have made a highly competitive printer that even rivals the Bambu Lab range of 3D printers.


