

Monk Makes CO2 Sensor for the BBC micro:bit
This board, designed for use with the Lets Talk Science Living Space Project, provides a CO2, temperature and Relative Humidity measurements to a BBC micro:bit. Getting Started Wire-up the board to...
Required products - sold separately

This board, designed for use with the Lets Talk Science Living Space Project, provides a CO2, temperature and Relative Humidity measurements to a BBC micro:bit.
Getting Started
Wire-up the board to your micro:bit as shown above. Then flash the following program onto your micro:bit by clicking the image to open the blocks editor and then click on Download (bottom of the web page) and copy the hex file onto your micro:bit.
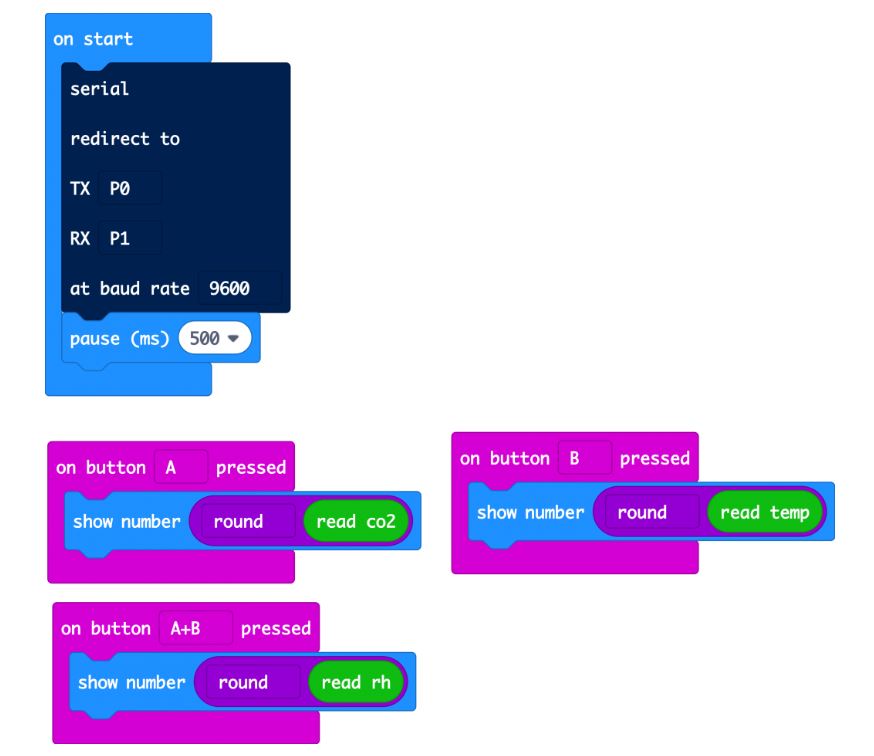
Once the program is uploaded, pressing Button A will display the CO2 level in parts per million of CO2. Pressing button B will display the temperature in degrees C and both buttons together will show the relative humidity.
If you are wondering about the big gray serial redirect block in the on start block, well this block starts serial transfer of data between the micro:bit and the CO2 sensor.
MicroPython
You can also use the board with MicroPython as the following code example shows.
Unless you are interested in the serial protocol used, you may want to copy the code below into your program and make use of the functions get_co2(), get_tempC() and get_rh().
from microbit import *uart.init(tx=pin0, rx=pin1)co2 = 0tempC = 0rh = 0def check_incoming_messages(): global co2, tempC, rh if uart.any(): response = str(uart.read(), 'UTF-8') if len(response) < 8: return cmd_letter = response[1] cmd_value_str = response[2:8] value = int(cmd_value_str) if cmd_letter == 'Z': co2 = value elif cmd_letter == 'T': tempC = (value - 1000) / 10.0 elif cmd_letter == 'H': rh = value / 10 def get_co2(): uart.write('Z\r\n') sleep(100) check_incoming_messages() return co2 def get_tempC(): uart.write('T\r\n') sleep(100) check_incoming_messages() return tempCdef get_rh(): uart.write('H\r\n') sleep(100) check_incoming_messages() return rh # Copy the code above into your program and then use the functions# get_co2, get_tempC and get_rh in your own codewhile True: display.scroll(get_co2()) if button_a.was_pressed(): display.scroll('T=' + str(get_tempC())) if button_b.was_pressed(): display.scroll('RH=' + str(get_rh())) sleep(500)
CO2 Concentrations
So, what do these readings mean?
Fresh outdoor air should give a reading of around 400. In a smallish room with a few people in it, this will rapidly rise above 1000, as people breathe out CO2. If it gets above 2000 then your air is getting dangerously unhealthy.
Calibration
Your sensor is a sensitive scientific instrument and the readings it gives will gradually get less accurate. If you leave the sensor powered-up in a well ventilated room for 24 hours, then it will calibrate itself automatically.
You can also force calibration using the Calibrate CO2 block in the COZIR blocks category. This will set the sensor’s readings back to 400. So you should run this block only after the sensor has been in fresh air for 30 mins or so.
Altitude Compensation
If you live somewhere high up, then you need to tell the sensor about this by putting a Set Altitude block into your On Startup block and then changing its number to your altitude above sea-level in meters.
Battery Power
Once you have the code all working, you can disconnect the USB power and instead power the CO2 Sensor Board through the DC barrel jack using either a battery pack or a DC adapter. In both cases the power supply should be of between 5 and 9V.
When powered by batteries in this way, the CO2 sensor will provide power back to the micro:bit. But make sure you have the power leads connected right between the CO2 sensor board and the micro:bit or your micro:bit could be damaged.
Find your BBC micro:bit Project Kit & Accessories here!
You can do a lot with a BBC microbit but you can do so much more when you combine it with a microbit project kit and accessories. We've carefully selected project kits and accessories from world leading manufactures including 4tronix, DF Robot, Elecfreaks, Kitronik, Monk Makes , Seeed and Sparkfun to create a one stop shop for you.
To help you find the perfect microbit project for your students or the vital missing component to finish your microbit project we've sorted our extensive range of BBC micro:bit projects and accessories into sub-categories. Click on a sub-category and then use the filters to narrow your search even more.
Can't find what you're looking for? Chat With Us online, send us an email call us on 1800 634 050 our expert staff are standing by to help you.